
1. Overview
Human needs have increased tremendously. Now people are doing much more composite tasks than ever before. The society has become very complex, a person has to work with huge amount of information every day. In order to work with the enormous information, we must have a system where we can store, manipulate and share the information all over the world. It is one of the core reasons for introducing Database Management Systems (DBMS) as well as Relational Database Management Systems (RDBMS) now-a-days.
So, one thing is clear to us that we store and manipulate data / information into a database, where the database contains various types of tables for storing various types of data / information.
Developers can create tables of a database; it would be possible to stop at this point and just start working with our data from here. However this would not be one of our best choices, but why? Because it is not really a good idea for better performances, let’s take an example:
“A library has a huge collection of books, files, etc... A student requests the librarian for a book of Microsoft SQL Server 2008, if we think without an index the librarian had to find this without any help s/he has to search one by one! Which must be time consuming; so with a proper arrangement, that is with the help of an index, it very much easier and faster to find out the desired one.”
There are many ways to create an index, but first of all we need to know what is an index is and how it is held within SQL Server.
2. What is an Index?
A SQL table explanation is not good enough for getting the desired data very quickly or sorting the data in a specific order. What we actually need for doing this is some sort of cross reference facilities where for certain columns of information within a table, it should be possible to get whole records of information quickly. But if we consider a huge amount of data in a table, we need some sort of cross reference to get to the data very quickly. This is where an index within SQL Server comes in.
So an index can be defined as:
- “An index is an on-disk structure associated with a table or views that speed retrieval of rows from the table or view. An index contains keys built from one or more columns in the table or view”. These keys are stored in a structure (B-tree) that enables SQL Server to find the row or rows associated with the key values quickly and efficiently.”
- “An index is a database object created and maintained by DBMS. It is essentially a list of the contents of a column or group of columns. Indexes are ordered so that extremely first search can be computed through them to find data.”
3. Why Use an Index?
Use of SQL server indexes provide many facilities such as:
- Rapid access of information
- Efficient access of information
- Enforcement of uniqueness constraints
Correct use of indexes can make the difference between a top performing database with high customer satisfaction and a non-performing database with low customer satisfaction.
4. Types of Indexes
SQL Server has two major types of indexes:
- Clustered
- Non-Clustered
The index type refers to the way the index is stored internally by SQL Server. So a table or view can contain the two types of indexes.
4.1 Clustered
An index defined as being clustered, defines the physical order that the data in a table is stored. Only one cluster can be defined per table. So it can be defined as:
- Clustered indexes sort and store the data rows in the table or view based on their key values. These are the columns included in the index definition. There can be only one clustered index per table, because the data rows themselves can be sorted in only one order.
- The only time the data rows in a table are stored in sorted order is when the table contains a clustered index. When a table has a clustered index, the table is called a clustered table. If a table has no clustered index, its data rows are stored in an unordered structure called a heap.
4.2 Non-Clustered
As a non-clustered index is stored in a separate structure to the base table, it is possible to create the non-clustered index on a different file group to the base table. So it can be defined as:
- Non-Clustered indexes have a structure separate from the data rows. A non-clustered index contains the non-clustered index key values and each key value entry has a pointer to the data row that contains the key value.
- The pointer from an index row in a non-clustered index to a data row is called a row locator. The structure of the row locator depends on whether the data pages are stored in a heap or a clustered table. For a heap, a row locator is a pointer to the row. For a clustered table, the row locator is the clustered index key.
- You can add nonkey columns to the leaf level of the Non-Clustered index to by-pass existing index key limits, 900 bytes and 16 key columns, and execute fully covered, indexed, queries.
More information about indexes can be found at this link.
Both clustered and non-clustered indexes can be unique. This means no two rows can have the same value for the index key. Otherwise, the index is not unique and multiple rows can share the same key value.
Note: Indexes are automatically maintained for a table or view whenever the table data is modified.
5. Uniqueness
An index can be defined either as unique or non-unique. A unique index ensures that the data contained within the unique index columns appear only once within the table, including “
NULL”. A unique index is commonly implemented to support the constraints.
SQL Server automatically enforces the uniqueness of the columns contained within a unique index. If an attempt is made to
INSERT a value/data that already exists in the table, then an error will be generated by the SQL Server and finally the attempt to INSERT the data will fail.
A non-unique index is also applicable as there can be duplicate data; a non-unique index has more overhead than a unique index when retrieving data.
6. Creating a Table
What is a table? The foundation of every Relational Database Management System is a database object called table. Every database consists of one or more tables, which stores the database’s data/information. Each table has its own unique name and consists of columns and rows.
Syntax of Creating Table
CREATE TABLE
    [ database_name.[ owner ] . | owner. ] table_name
    ( { < column_definition >
        | column_name AS computed_column_expression
        | < table_constraint > } [ ,...n ]
    )
In this article, we will not discuss database tables. I hope that every one knows the basic concepts about database tables.
7. Creating an Index

As we discuss what an index is, why we use an index, types of indexes, etc, we are going to discuss how to create an index. There are two ways of creating an index they are as follows:
- Creating an Index using SQL Server Table Designer
- Creating an Index using Transact-SQL
7.1 Creating an Index using by SQL Server Table Designer
SQL Server Table designer is an excellent feature to manage various tables designing creation, modification, indexing and so much more. Here you need to follow the step(s) below to create an index using the SQL Table designer.
Step(s)
- Open your SQL Server Enterprise Management Studio and choose your database for creating a table index. Now select your desired table and open the Table Design window. The following figure shows how to do this.
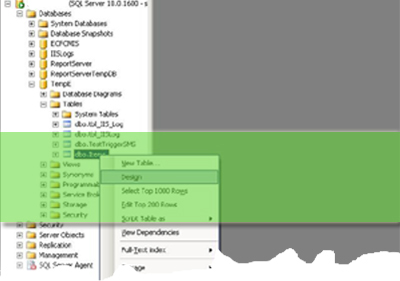
- Figure 1 (How to open SQL Table Designer)
- A window will appear where you will find all the available inputs for creating a Table. You just need to input the columns name, data type length and also you may set the columns to allow
nullvalue or not. Note that you can set a default value of a column. The following figure will show you how you can perform all of this:
- Figure 2 (How to set table columns, data type, length, etc.)
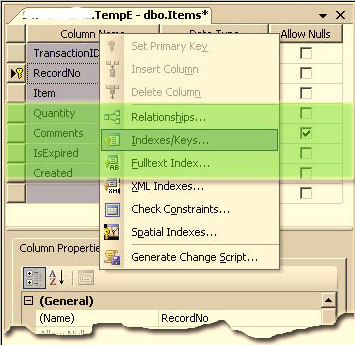
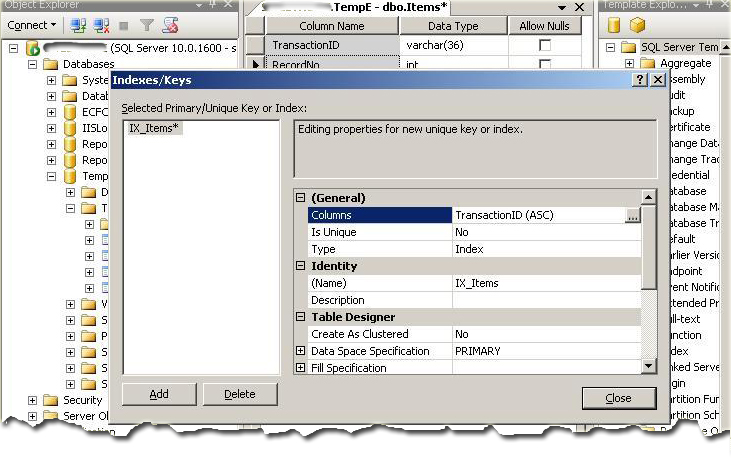
- Well, now you know how to create a table. Let's see how to set an index in a table. Select the column by clicking your mouse button, a new popup menu will appear, select/click the Indexes/Keys for opening a new window where you can configure the columns for indexing. The following figure will show how to set an index.
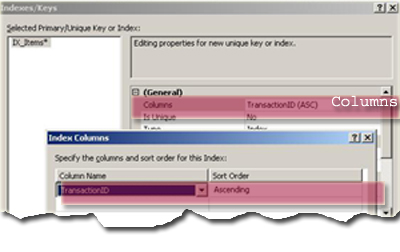
Figure 2.1 (A) (How to configure an Index)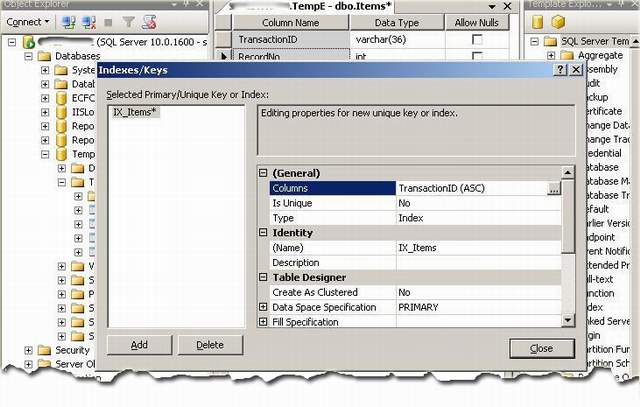
Figure 2.1 (B) (How to Configure an Index) - Now you just select the column from the general properties as shown in figure 3, and add the specify column short order of the index.
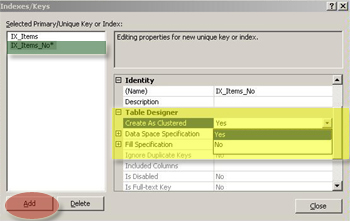
Figure 4 (How to set a Clustered Index)You can configure the index as clustered or non-clustered from the Create as clustered properties. Figure 4 shows the configuration of clustered or non-clustered indexes by default.
So we discussed how to create an index by using SQL Server Table Designer. Let’s try to create an index by using Transact-SQL.
7.2 Creating an Index – Transact-SQL
If we want to create an index by using Transact – SQL , we must know the columns detail for index creation. A sample syntax is given below.
Syntax
CREATE INDEX <index_type> <index_name> ON <table_name> (
<column_name1> <index_order>,
<column_name2> <index_order>,
)

CREATE UNIQUE INDEX <index_type> <index_name> ON <table_name> (
<column_name1> <index_order>,
<column_name2> <index_order>,
)
7.3 Drop an Index
Removes one or more indexes from the current database.TheDROP INDEXstatement does not apply to indexes created by definingPRIMARY KEYorUNIQUEconstraints (created by using thePRIMARY KEYorUNIQUEoptions of either theCREATE TABLEorALTER TABLEstatements, respectively). For more information aboutPRIMARYorUNIQUE KEYconstraints, see "CREATE TABLE" or "ALTER TABLE" in this volume.Syntax
DROP INDEX 'table.index | view.index' [ ,...n ]8. Index and Statistics
When retrieving data, SQL Server obviously has to make some decisions as to the best way to get to data and return it to the query requesting it. So SQL Server has some basic information to make sensible and accurate choices. This is where statistics comes in. SQL Server keeps statistics on each column, which are updated over a period of time and over a number of inserts or modifications.More information about indexes and statistics can be found at this link.9. Summary
In this article, I tried to cover SQL table indexing. I discussed why we use indexes and how they are used to quick and efficiently retrieve the data stored in the table. I also discussed various types of indexes, how to create / drop index, index uniqueness and index statistics as well.I hope that this article will be helpful to you. Enjoy!


